
300000
English | Français | فارسی | 中文 | Українська | Azerbaijani | ខ្មែរ | Tiếng Việt | Bahasa Melayu | Deutsch | O'zbek | Русский
This guide will introduce you to the subject of Knot Theory. The first section gives an introduction to important math theory concepts and terminology. If you are only looking for quick tips to solve the unknotting puzzles, skip ahead to the second section. You can always consult the first section if the meaning of some words is unclear.
 Introduction with Definitions
Introduction
First things first : what are knots? Knots in mathematics are different from knots in your everyday life.
What kinds of knots do you use every day?
How are these different from mathematical knots?
Are there any mathematical knots in everyday life?
How does the Unknotting game work?
Definitions
From here on, we only talk about mathematical knots. To avoid misunderstandings and to be able to decide whether any statement is true or false we should start with defining the meaning of several words for the rest of this page.
knot line:
knot diagram:
mathematical knot (or simply, knot):
ambient isotopy:
step:
crossing:
pass:
switch:
orientation:
crossing handedness:
writhe number:
knot invariant:
crossing number:
arc:
hole:
over-strand:
under-strand:
Reidemeister moves:
Reidemeister 1 move:
Reidemeister 2 move:
Reidemeister 3 move:
pass move:
P- move:
P0 move:
P+ move:
unknotting number:
How to Simplify Diagrams
Finding R1 Moves
Finding R2 Moves
About the Interface (1)
Finding P- Moves
Finding R3 Moves
About the Interface (2)
Finding P0 Moves
Finding P+ Moves
Finding U1 Moves
Finding U2 Moves
Finding P0U Moves
Tips and Tricks by Puzzle Type
More References about Knots
Introduction with Definitions
Introduction
First things first : what are knots? Knots in mathematics are different from knots in your everyday life.
What kinds of knots do you use every day?
Most of us use knots to tie our shoelaces, put on a necktie or scarf, to close up a bag, and so on... You might know many more knots if you go sailing, camping, fishing, or if you sew, knit, or style hair. However, none of these are mathematical knots!
How are these different from mathematical knots?
Have a look at the following two drawings of knots. Confusingly, these are both known as 'figure-eight' knots, because of the figure 8 they contain.
What big difference can you see? We're sure you can figure it out!
Everyday Figure-eight Knot
Mathematical Figure-eight Knot
What big difference can you see? We're sure you can figure it out!
The biggest difference is that the mathematical knot is a closed curve − that is, there are no loose ends, it's a closed loop. What we call 'knots' in everyday life are known as 'braids' in mathematics.
Also, while everyday knots might include more than one strand of material, in mathematics knots are a single, closed, continuous strand. Objects that involve more than one knot woven together are known as 'links'.
Also, while everyday knots might include more than one strand of material, in mathematics knots are a single, closed, continuous strand. Objects that involve more than one knot woven together are known as 'links'.
Are there any mathematical knots in everyday life?
Of course! You now know that in mathematics, a knot is a single, closed, continuous strand.
With this definition in mind, what is the simplest mathematical knot?
How can you make a mathematical knot from a piece of string?
With this definition in mind, what is the simplest mathematical knot?
The simplest mathematical knot is just a single loop or circle, like this:
We will talk more about this knot later, but there are plenty of examples of simple loops like this in real life.
How can you make a mathematical knot from a piece of string?
The simplest mathematical knot is a circle. To make it, simply glue the ends of your string together.
What happens if you twist your circle once?
Is this a different knot?
Can all knots be deformed to make a circle?
How different can a knot diagram look from the simplest form?
What happens if you twist your circle once?
If you take your loop of string, twist it, and lay it flat, you might get something like this:

Is this a different knot?
Of course knot! All you did was twist it.
This might seem easy, but finding ways to tell whether two diagrams (pictures) show the same knot is a very important and difficult question for mathematicians who study Knot Theory.
One way to tell that two pictures represent the same knot is whether you can deform one of them to look like the other. For example, here you just need to twist it back to get the loop.
Can all knots be deformed to make a circle?
To answer this question, try this out:
Can you deform this to get a circle?
- take a strand of string
- twist it to form a loop
- pass one end through the loop
Can you deform this to get a circle?
Try as you might, there is no way to deform this knot into a circle. At least, not without cutting the string and gluing it back together.
This is actually a different mathematical knot, called the trefoil knot because it looks like a three-leaf clover.
This is actually a different mathematical knot, called the trefoil knot because it looks like a three-leaf clover.
How different can a knot diagram look from the simplest form?
Another important property of mathematical knots is that they can be arbirtrarily stretched and bent. For example, our diagram of the simplest knot looks more like a square than a circle − we could draw it as a perfect circle, and it would be the same knot. You could take the simplest knot, a circle, and stretch it out into a long thin ellipse, then use it as a string to tie it into the 'everyday figure-8 knot'. Mathematically, it is still a circle.
As you might expect, then, the different diagrams of the same underlying knot can look drastically different! For example, the Gordian Knot and this diagram can both be deformed into a circle, with enough patience. They are the diagrams of the same knot as the circle.
The circle is just the easiest way of drawing this knot, but the knot isn't really a circle, it's an abstract mathematical object that we can represent in many different ways. In the same way that "1 car" and "1 apple" is not the number 1, a circle is just one way to represent this knot.
How does the Unknotting game work?
In this game, you deform mathematical knot diagrams to reduce the number of crossings as much as possible.
While you are allowed to 'cut' the strands by clicking on them, you are only modifying the diagram, not the underlying knot. This is why there is a restriction on how you can reattach the ends you have 'cut'. This restriction guarantees that the mathematical knot is unchanged in any re-routing of strands even if the knot changes its appearance..
When do you undo everyday knots in real life?
Try some other mathematical knot games!
While you are allowed to 'cut' the strands by clicking on them, you are only modifying the diagram, not the underlying knot. This is why there is a restriction on how you can reattach the ends you have 'cut'. This restriction guarantees that the mathematical knot is unchanged in any re-routing of strands even if the knot changes its appearance..
When do you undo everyday knots in real life?
You might be familiar with the struggle of disentangling electronics cables like for earbuds. If you tie your shoes, you have to untie the laces.
The same property of real knots is what makes them useful, but also harder to undo.
What makes knots in real life so hard to undo?
The same property of real knots is what makes them useful, but also harder to undo.
What makes knots in real life so hard to undo?
The answer is friction! However, mathematical knots have no friction. You can think of them as 'infinitely slippery'.
Try some other mathematical knot games!
Our unknotting game is one way to have fun with knots on a screen, but here are some other games for you to try:
- 1 player : Eiffel Tower and other string tricks
- 2 players : Cat's cradle
- Group : Human Knot
Definitions
From here on, we only talk about mathematical knots. To avoid misunderstandings and to be able to decide whether any statement is true or false we should start with defining the meaning of several words for the rest of this page.
knot line:a closed curve in 3-dimensional space which does not intersect itself and which has a finite thickness (to avoid infinitely many smaller and smaller knots along the line), Example: the figure-8 knot.
knot diagram:
a projection of a knot line into 2 dimensions where different parts of the knot line can cross each other (on this website lines cross under an angle of 90°), but do not lie on top of each other.
The 'unknot' is also called the 'trivial knot'.
Which knot does each of these 3 diagrams represent?
Which knot does this diagram represent?
Do you see how to deform this into the earlier trefoil diagram?
Unknot
Trefoil
Figure-eight
Cinquefoil
Three-twist
The 'unknot' is also called the 'trivial knot'.
Which knot does each of these 3 diagrams represent?
The unknot. Do you see how they can be deformed to a rectangle?
Which knot does this diagram represent?
The trefoil.
Do you see how to deform this into the earlier trefoil diagram?
You can deform this diagram into the other by flipping down the top arc.
mathematical knot (or simply, knot):
the abstract object behind a set of (infinitely many) knot diagrams that can all be deformed, stretched, and shifted into each other without being cut. Example: the knot 31 also called 'trefoil' which is the simplest non-trivial knot.
ambient isotopy:
the mathematical term when one knot line can be continuously distorted to another one.
step:
On this website knot diagrams are drawn using only 6 tiles which we call steps:
crossing:
the place in a diagram where two steps cross, one on top of the other:
pass:
a step that is part of a crossing, there are over-passes (fully visible) and under-passes (partially covered).
switch:
swapping over- and under-pass of a crossing, i.e. switching between these two crossings:

 If a crossing is switched, the old and new diagram in general represent different knots. Switching all crossings is equivalent to changing a knot to its mirror image. Some knots are identical to their mirrored version, that means there is an ambient isotopy between them. These are called 'achiral'. For example, the figure-8 knot is achiral. Others can not be deformed to their mirrored version, like the trefoil. They are called 'chiral'.
Can this knot be deformed into its mirror image?
Can this knot be deformed into its mirror image?
Yes! This diagram represents the figure-eight knot which is achiral and can be deformed into its mirror image as follows:
Notice that the only difference between the first diagram and the last one is that all of the crossings are switched!
Initial position
A 180° rotation
Moving a strand
The mirror image
Notice that the only difference between the first diagram and the last one is that all of the crossings are switched!
orientation:
This is not a property of the knot line, nor of the knot. It is a question of how to move along the knot line. One can move in 2 directions, also called 2 orientations.
A knot that can be deformed via an ambient isotopy into itself but with the orientation reversed is called 'invertible' otherwise it is called noninvertible. The smallest noninvertible knot is 817 which is achiral but if an orientation is added it becomes chiral (find more on the Invertible Knot Wikipedia page). Adding more structure (here an orientation) causes 817 to lose symmetry (not identical anymore to its mirror image).
The figure-eight knot mentioned above has crossing number 4, so less than 8, and must therefore be invertible.
How could the figure-eight knot be deformed to leave its diagram unchanged, but with the orientation reversed?
In an earlier example, a figure-eight knot was transformed via a simple deformation into its mirror image. This deformation also changed the orientation− please verify it for yourself! So, if one wanted to deform the diagram to its mirror image without reverting orientation, then one could simply combine both sequences.
A chiral knot (a knot that can not be deformed to its mirror image) can still be invertible (symmetric against change of orientation). Such knots are called 'reversible'.
The figure-eight knot mentioned above has crossing number 4, so less than 8, and must therefore be invertible.
How could the figure-eight knot be deformed to leave its diagram unchanged, but with the orientation reversed?
The following sequence proves that the knot is invertible because a diagram of this knot can be deformed into the same diagram but with reversed orientation.
Initial projection
Rerouting
Afterwards
Rerouting
Afterwards
Rerouting
Afterwards
Rerouting
Afterwards
Afterwards
Widened, now
with opposite orientation
with opposite orientation
In an earlier example, a figure-eight knot was transformed via a simple deformation into its mirror image. This deformation also changed the orientation− please verify it for yourself! So, if one wanted to deform the diagram to its mirror image without reverting orientation, then one could simply combine both sequences.
A chiral knot (a knot that can not be deformed to its mirror image) can still be invertible (symmetric against change of orientation). Such knots are called 'reversible'.
crossing handedness:
For a given knot diagram, crossings are either right- or left-handed.
In the following we will explore two types of crossings and determine which is right- or left-handed.
How many different crossings are there if we consider which pass is an over-/under-pass and consider both orientations?
If one keeps the diagram unchanged and only switches one crossing, does the handedness of that crossing change?
By using one's hands, how can one remember whether a crossing is right- or left-handed?
In the following we will explore two types of crossings and determine which is right- or left-handed.
How many different crossings are there if we consider which pass is an over-/under-pass and consider both orientations?
In total there are 8 cases:
If the horizontal pass is the over-pass then there are 4 options:


 Similarly if the vertical pass is the over-pass then there are 4 more options:


The crossings in group 1, 7, 4, 6 are called right-handed crossings and
the crossings in group 2, 5, 3, 8 are called left-handed crossings.
If the horizontal pass is the over-pass then there are 4 options:
1
2
3
4
5
6
7
8
- Principle: Handedness should not depend on the orientation (direction of stepping through the knot line), so reversing both arrows we identify 4 pairs of crossings: 1 = 4, 2 = 3, 5 = 8, 6 = 7. Therefore, whichever groups we end up with, crossings 1 and 4 should be in the same group and so on.
- Principle: The group that a crossing belongs to should not change if we rotate the whole knot. We therefore identify crossings 1 = 7 = 4 = 6 and 2 = 5 = 3 = 8.
The crossings in group 1, 7, 4, 6 are called right-handed crossings and
the crossings in group 2, 5, 3, 8 are called left-handed crossings.
If one keeps the diagram unchanged and only switches one crossing, does the handedness of that crossing change?
Yes. Try switching any of the eight crossings, then check which one it has become and check whether it is still in the same handedness group. For example, switching crossing 1 gives crossing 5, both are in different handedness groups.
Statement: The question whether a crossing is right-handed or left-handed does not only depend on the crossing itself but on the diagram around it.
Proof: Whether the horizontal pass is above or below does not alone decide the handedness. Both cases can be right- and left-handed (see the 8 crossings above). If one rotates the knot so that the over-pass is horizontal and if one then leaves the crossing through the overhead pass to the right (to the East) then it depends on the rest of the knot whether one returns to the crossing from the South (then the crossing is right-handed) or from the North (then the crossing is left-handed).
The fact that the two groups of crossings are called left- and right-handed gives a hint that one can distinguish crossings with the left and right hands.
By using one's hands, how can one remember whether a crossing is right- or left-handed?
Stretch out your fingers so that all are in one plane, and your thumb is at a right angle to all others which are parallel to each other. Rotate your hand so that you can see your palm and your thumb points towards the outgoing direction of the over-pass and your fingers point towards the outgoing direction of the under-pass. The hand that can do that decides the handedness. For example, for the crossing below, you would stretch your hand out like this:
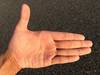
Since you can only do this with your left hand, this is a left-handed crossing.
Right- and left-handed crossings are also referred to as positive or negative crossings.
Since you can only do this with your left hand, this is a left-handed crossing.
Right- and left-handed crossings are also referred to as positive or negative crossings.
writhe number:
the difference between the number of left- and right-handed crossings in one diagram. The writhe number characterizes a diagram, not a knot as there can be 2 different diagrams of the same knot with different writhe numbers.
What is the writhe number of this diagram?
What is the writhe number of this diagram?
The right-handed crossings in the diagram are highlighted in red and the left-handed crossings in green. To get the writhe number, we can count the number of left- and right-handed crossings, then subtract the number of right-handed crossings from the number of left-handed crossings.
This diagram has 2 left-handed crossings and 4 right-handed crossings, so its writhe number is 2 − 4 = −2.
knot invariant:
a number or a polynomial or a feasibility statement that is characteristic for all (infinitely many) diagrams of a knot. The properties of a knot being chiral/achiral, invertible/noninvertible, reversible are knot invariants.
crossing number:
the minimal number of crossings that any diagram of this knot can have after deformation, this is a characteristic of each knot and therefore a knot invariant.
How many crossings does this diagram have?
What is the crossing number of the knot represented through the above diagram?
What are the two lowest crossing numbers that a knot can have?
How many crossings does this diagram have?
This diagram has 5 crossings.
What is the crossing number of the knot represented through the above diagram?
Zero! The crossing number is a property of the abstract mathematical knot, it is not the property of a diagram. The diagram above can be deformed to get the unknot
which has zero crossings.
Do you see how?
Because the crossing number is the minimal number of crossings of any diagram of a knot and because one cannot have less than zero crossings, the crossing number of the knot represented by the above diagram is zero.
Do you see how?
Because the crossing number is the minimal number of crossings of any diagram of a knot and because one cannot have less than zero crossings, the crossing number of the knot represented by the above diagram is zero.
What are the two lowest crossing numbers that a knot can have?
The lowest crossing number belongs to the unknot which is 0. A knot diagram with 1 crossing would look like:
and could be deformed to the unknot. A knot diagram with 2 crossings would look like
and could also be deformed to the unknot.
The trefoil diagram shown further above has 3 crossings and can not be deformed to the unknot, so the lowest crossing numbers are 0 and 3.
The trefoil diagram shown further above has 3 crossings and can not be deformed to the unknot, so the lowest crossing numbers are 0 and 3.
arc:
The part of the knot line in a diagram from one crossing to the next.
How many arcs does a diagram with N crossings have?
How many arcs does a diagram with N crossings have?
Each crossing has 4 ends of arcs. Each arc has 2 ends, so there are 4/2 = 2 times as many arcs as crossings, so 2N arcs.
hole:
empty space in a diagram that is surrounded by arcs. The whole empty space outside the diagram is also one hole.
How many holes does a diagram with N crossings have?
How many holes does a diagram with N crossings have?
One could draw several knots and guess a formula but one can derive it too. Euler's formula says that for any drawing in the plane where m lines (here m=2N arcs) each connect 2 out of n points (here n=N crossings) then the number f of faces (here holes) is f = 2 + m − n. That gives for the number of holes of a knot: 2 + 2N − N = N + 2
over-strand:
A sequence of consecutive arcs in a diagram (i.e. arcs following one another) which starts and ends at an under-pass and otherwise involves 0, 1 or more over-passes.
under-strand:
A sequence of consecutive arcs in a diagram (i.e. arcs following one another) which starts and ends at an over-pass and otherwise involves 0, 1 or more under-passes.
(In literature, a 'strand' is often used for what we call an over-strand. For us the number of over-passes of an over-strand matters as well as the number of under-passes of an under-strand. We therefore consider under-strands as well as over-strands.)
What kind of strand is the shown horizontal line consisting of five arcs?
How many over-strands does a diagram with N crossings have?
(In literature, a 'strand' is often used for what we call an over-strand. For us the number of over-passes of an over-strand matters as well as the number of under-passes of an under-strand. We therefore consider under-strands as well as over-strands.)
What kind of strand is the shown horizontal line consisting of five arcs?
This is an under-strand with 4 under-passes.
How many over-strands does a diagram with N crossings have?
At each crossing there are 2 ends of strands (either one end of 2 different strands or both ends from one strand). On the other hand, each strand has 2 ends which are at a crossing. Therefore the number of crossings is equal to the number of over-strands and because of symmetry also equal to the number of under-strands, so there are N of each.
Reidemeister moves:
In 1927 the German mathematician Kurt Reidemeister and, independently, James Waddell Alexander and Garland Baird Briggs (1926), proved that any two diagrams that represent the same knot can be deformed into each other through a sequence of only 3 different types of moves. The problem is that during the deformation the number of crossings may temporarily rise and a sharp upper bound for this increase is unknown as well as the number of needed moves.
Reidemeister 1 move:
removes or adds a hole surrounded by one arc:
Which diagram shows a left-handed crossing and which shows a right-handed crossing?
Which diagram shows a left-handed crossing and which shows a right-handed crossing?
The left diagram shows a right-handed crossing and the right diagram shows a left-handed crossing. A Reidemeister 1 move therefore changes the number of right- or left-handed crossings by 1 and thus changes the writhe number of the diagram.
Reidemeister 2 move:
removes or adds a hole surrounded by 2 arcs:
What can one say about the handedness of the two crossings that are added or removed in a Reidemeister 2 move?
What can one say about the handedness of the two crossings that are added or removed in a Reidemeister 2 move?
One of the two crossings is right-handed and one is left-handed. A Reidemeister 2 move therefore does not change the writhe number of a diagram.
Reidemeister 3 move:
removes and adds a hole surrounded by 3 arcs.
Which 2 types of holes surrounded by 3 arcs can you think of?
Which 2 types of holes surrounded by 3 arcs can you think of?
Either:
Verify that the result of the 3 moves is always the same.
Does the handedness of the 3 crossings change in a Reidemeister 3 move?
What have we learned?
- 1) each arc has 1 over-pass and 1 under-pass:then none of the 3 arcs can be moved over/under/through the other crossing
- 2) one arc has 2 over-passes, one has 1 over- and 1 under-pass, and one has 2 under-passes:then there are 3 moves. One can move the over-over-strand which stays an over-over-strand:
or move the under-over-strand which becomes an over-under-strand:
or move the under-under-strand which stays an under-under-strand:
Verify that the result of the 3 moves is always the same.
When comparing the right-hand sides of the above moves it is easy to see that all 3 moves produce identical results. Therefore, if there is a Reidemeister 3 move then there is only one. All that changes is that for all 3 arcs the other two arcs are now crossed in the reverse order. This means that for the middle arc the order of over-pass and under-pass is reversed.
Does the handedness of the 3 crossings change in a Reidemeister 3 move?
No. To see that, pick any orientation for each strand and use the hand rule above.
What have we learned?
We learned:
- how to spot holes with 3 arcs that allow a Reidemeister 3 move,
- that for such a hole it does not matter which arc is moved,
- that the handedness of the 3 crossings does not change,
- that the order of over- and under-pass is reversed for the middle arc.
pass move:
This has nothing to do with a 'pass' defined above. A pass move replaces an over-(under-)strand with another over-(under-)strand where both strands have the same ends. For examples, please see P-, P0 and P+ moves below.
P- move:
a pass move where the new strand has less passes than the old strand.
Find a P- move replacing the green strand in this diagram:
Find a P- move replacing the green strand in this diagram:
In this diagram the new red strand has fewer passes than the old green strand. Therefore this diagram shows a P- move.
P0 move:
a pass move where the new strand has the same number of passes as the old strand.
Find a P0 move replacing the green strand in this diagram:
Find a P0 move replacing the green strand in this diagram:
In this diagram the new red strand has the same number of passes as the old green strand. Therefore this diagram shows a P0 move.
P+ move:
a pass move where the new strand has more passes than the old strand.
Find a P+ move replacing the green strand in this diagram:
P+ moves become necessary if one wants to change the writhe number of a diagram. More about that is described further below under 'Finding P0 Moves'.
Find a P+ move replacing the green strand in this diagram:
In this diagram the new red strand has one more pass than the old green strand, therefore this is a P+ move.
P+ moves become necessary if one wants to change the writhe number of a diagram. More about that is described further below under 'Finding P0 Moves'.
unknotting number:
The unknotting number is the property of a knot, not the property of a diagram and is therefore a knot invariant.
Starting with a knot diagram it is the minimal number of times that one or more crossings need to be switched in order to obtain the unknot. Before the first switch and inbetween switches the diagram can be arbitrarily deformed. The unknotting number is therefore not an easy number to determine because any deformation is allowed.
Why does the trefoil have unknotting number 1?
The trefoil cannot have the unknotting number 0 because it cannot be deformed into the unknot (this needs to be and can be proven). The unknot has unknotting number 0. So the trefoil has unknotting number ≥1. On the other hand one can easily see that switching any one crossing of the trefoil diagram shown further above produces the unknot, so the unknotting number of the trefoil is ≤1. If it is ≥1 and ≤1 then it must be =1.
How to Simplify Diagrams
Finding R1 Moves
Simple cases of R1 moves, like here:
where one can flip a loop 4 times and instantly get the unknot
are easy to spot by following the knot line and looking for an arc with both ends at the same crossing. The order of performing R1 moves does not matter.
But there are more general cases of applying Reidemeister 1 moves. If an over-strand starts at a crossing of which it is an overpass but otherwise lies completely on top of other arcs (therefore being called 'over-strand') then this loop can surely be shortcut and thus removed. For example, at first the loop on top in the center can be removed and then the other ones, one by one:
This loop can also be removed when lying entirely underneath:
But there are more general cases of applying Reidemeister 1 moves. If an over-strand starts at a crossing of which it is an overpass but otherwise lies completely on top of other arcs (therefore being called 'over-strand') then this loop can surely be shortcut and thus removed. For example, at first the loop on top in the center can be removed and then the other ones, one by one:
Finding R2 Moves
Similarly to R1 moves it is easy to spot prototype R2 moves like here where two R2 moves need to be done before an R1 move yields the unknot:
In the following example one has to perform an R2 move with the same strand twice, once pulling this strand from underneath and once from above:
The last step is not an R2 move. It is only added to show that the knot is the sum of two trefoil knots.
About the Interface (1)
The example above is suitable to demonstrate the optimal use of the interface. After intercepting the knot line:
One can NOT retreat one end all the way; and then retreat the other end all the way because one would first remove an under-pass and have both ends in the under-pass status and in this status it is not possible to remove an over-pass. Instead, one removes one under-pass, jumps to the other end, removes the other under-pass which brings both ends into the same hole, which changes the ends into neutral status and then allows to remove over-passes and then to re-unite the ends. In short, one jumps between ends to remove all under-passes then all over-passes and so on.
This implementation of a status of ends is not a weakness of the program but it guarantees that interactive modification of the diagram does not change the mathematical knot.
This implementation of a status of ends is not a weakness of the program but it guarantees that interactive modification of the diagram does not change the mathematical knot.
Finding P- Moves
P- moves replace an over-strand with one having less over-passes or an under-strand with one having less under-passes. In both cases the number of crossings is reduced.
To find such moves one steps through the knot line and looks for as many consecutive over-passes as possible or for as many consecutive under-passes as possible, at least two. If one found such a strand, for example, an over-strand then one tries to find an alternative route with less over-passes that links the same two under-pass ends.
In the following example a strand with 4 consecutive under-passes is replaced by a strand without underpasses and then this strand with 3 consecutive over-passes is replaced by a strand with one over-pass. Two more P- moves remove each 2 more crossings. The resulting diagram can be simplified further by two more R1 moves, as seen below.
The more consecutive passes of one sort one finds, the higher the chance to find a different route that needs less passes.
To find such moves one steps through the knot line and looks for as many consecutive over-passes as possible or for as many consecutive under-passes as possible, at least two. If one found such a strand, for example, an over-strand then one tries to find an alternative route with less over-passes that links the same two under-pass ends.
In the following example a strand with 4 consecutive under-passes is replaced by a strand without underpasses and then this strand with 3 consecutive over-passes is replaced by a strand with one over-pass. Two more P- moves remove each 2 more crossings. The resulting diagram can be simplified further by two more R1 moves, as seen below.
Finding R3 Moves
R1, R2 and P- moves change the number of crossings. An R3 move does not change the number of crossings, therefore we place its description after the P- move. The following example shows how R3 moves can still be useful by making P- moves possible. As described in the first section, an R3 hole is surrounded by a top arc with 2 over-pass ends (here A,B), a middle arc with 1 over-pass end (C) and 1 under-pass end (B) and a bottom arc with 2 under-pass ends (here A,C).
(unknot taken from the Unknot Wikipedia page)
We found in the above section that an R3 move reverses for the middle strand (here through B,C) the order of under- and over-pass. An R3 move is beneficial if the R3 move leads for the continuation of the middle arc to an increase of consecutive over-passes and/or consecutive under-passes and thus increases the chance to find a P- move. This is the case if in the continuation of the middle arc after the under-pass B comes an over-pass (D,E are over-passes) and/or after the over-pass (C) follows an under-pass (F,G,H are under-passes). The R3 move slides the middle arc BC between the top arc and bottom arc at A:
Before, there were only 2 consecutive over-passes at D and E, now there are 3 at C, D and E. This longer over-strand can now be re-routed in a P- move:
reducing the number of crossings by 2 from 13 to 11.
Also, the other side of the strand can be re-routed in a P- move. Before, there were 3 consecutive under-passes at F,G and H, now there are 4 at B, F, G, and H. This P- move leads to:
and is also reducing the number of crossings by 2. Both diagrams can be simplified further through P- and R1 moves resulting finally in the unknot. Can you see how? Just follow the hints on how to spot P- moves given above.
Let us practise that with an example.
How many R3 moves are possible in this diagram:
We found in the above section that an R3 move reverses for the middle strand (here through B,C) the order of under- and over-pass. An R3 move is beneficial if the R3 move leads for the continuation of the middle arc to an increase of consecutive over-passes and/or consecutive under-passes and thus increases the chance to find a P- move. This is the case if in the continuation of the middle arc after the under-pass B comes an over-pass (D,E are over-passes) and/or after the over-pass (C) follows an under-pass (F,G,H are under-passes). The R3 move slides the middle arc BC between the top arc and bottom arc at A:
Also, the other side of the strand can be re-routed in a P- move. Before, there were 3 consecutive under-passes at F,G and H, now there are 4 at B, F, G, and H. This P- move leads to:
Let us practise that with an example.
How many R3 moves are possible in this diagram:
Three R3 moves are possible. For each one we show in light blue the three arcs that are involved. What is easily overlooked is the third one where the hole is the whole outside space which is 'surrounded' by only 3 arcs.
Perform the 1. R3 move and find out whether it is beneficial:
Perform the 2. R3 move and find out whether it is beneficial:
Perform the 3. R3 move and find out whether it is beneficial:
1. R3 move
2. R3 move
3. R3 move
Perform the 1. R3 move and find out whether it is beneficial:
This R3 move is beneficial. It allows afterwards a P- move as shown in a sequence of moves further below. Our definition for an R3 move to be beneficial it is not necessarily to allow a P- move but to increase the number of consecutive over- or under-passes and that is easy to see even without performing all these moves. In the following diagram the middle arc of the R3 hole has an over-pass at A, an under-pass at B followed by two over-passes at C and D. In an R3 move the order of over- and under-pass is reversed for the middle arc as shown in the Diagram 3 with now 3 consecutive over-passes. This is enough to find a P- move needing less than 3 passes in Diagram 5.
About the sequence of diagrams below: In Dia 1 we make space to prepare the R3 move in Dia 2 (here by moving the top arc) with the result in Dia 3. In Dia 4 we make space to prepare the P- move in Dia 5 where the green strand with 3 over-passes is replaced by the red strand with only 1 over-pass in Dia 6. In Dia 7 we shift a strand to make space for the next P- move in Dia 9 with result in Dia 10 and Dia 11 after shrinking which is easily identified as knot 51.
1. Widening
2. R3 move
3. After the R3 move
4. Widening
5. A P- move
6. After the P- move
7. For the next P- move
8. Before the P- move
9. The 2nd P- move
10. Afterwards
11. Contracted
Perform the 2. R3 move and find out whether it is beneficial:
The sequence shows that the R3 move is beneficial.
1. Widening
2. The R3 move
3. After the R3 move
4. A P- move
5. After the P- move
6. Another P- move
7. After the P- move
8. Contracted
Perform the 3. R3 move and find out whether it is beneficial:
The 3rd R3 move is also beneficial. To execute this move, one follows the same principle: the middle strand cuts the two other strands, which this time 'surround' the outside hole, in reverse order.
The result is that travelling upwards in the Dia 2 along the light blue strand one first gets to an overpass and then an underpass. If after the R3 move one travels along the red strand then one passes the other 2 strands in reverse order and therefore first gets to an underpass and then an overpass. As one can see in Dia 5, the sequence of now 3 consecutive underpasses of the light blue strand there enables a P- move.
The result is that travelling upwards in the Dia 2 along the light blue strand one first gets to an overpass and then an underpass. If after the R3 move one travels along the red strand then one passes the other 2 strands in reverse order and therefore first gets to an underpass and then an overpass. As one can see in Dia 5, the sequence of now 3 consecutive underpasses of the light blue strand there enables a P- move.
1. Widening
2. An R3 move
3. After the R3 move
4. Widening
5. A P- move
6. Widening
7. A 2nd P- move
8. After the P- move
9. Shortening
10. After Shortening
11. Shortening
12. Straightening
13. ↻90° rotation
About the Interface (2)
The example above is suitable to demonstrate how to perform an R3 move with our interface.
As described in the 'Introduction with Definitions' > 'Reidemeister 3 move' there are 3 ways to perform a Reidemeister 3 move: moving the bottom strand, moving the middle strand, or, moving the top strand. As shown there, all 3 ways have the same result, they perform the same Reidemeister 3 move.
Our interface only allows one to complete an R3 move by moving the bottom strand or the top strand but not the middle strand. The reason is the feature of our interface that BOTH ends can only add/remove over-passes or BOTH ends can only add/remove under-passes at a time. But that does not prevent us from performing R3 moves, as moving any one of the 3 strands gives the same result.
Finding P0 Moves
P0 moves are pass moves that do not change the number of crossings, just like R3 moves which are special versions of P0 moves. Like R3 moves, a P0 move may be beneficial and enable a P- move. Because P0 moves are less useful on average, they occur more frequently but it is more challenging to see whether they enable a P- move.
To find a P0 move one looks for an over-strand or an under-strand just like for a P- move. To check whether a P0 move may be beneficial and enable a P- move one proceeds like in the case of the R3 move. One looks whether the removal of the strand increases the number of consecutive over- or under-passes of strands that were crossed and one checks whether after re-routing the new strand increases the number of consecutive over- or under-passes of strands that are crossed now. In either one of these cases one checks whether the strands with an increased number of consecutive over- or under-passes can be re-routed with less crossings.
Let us look at this example:
We label the crossings:
and find a beneficial P0 move step by step.
How many over-strands with at least 2 over-passes and how many under-strands with at least 2 under-passes do you see?
It is not difficult to see that the IE strand has a P0 move that re-locates it to cross over the GC and BH strand:
but the question is whether this P0 move is beneficial.
Did moving the IE strand increase the number of consecutive over-/under-passes of the previously crossed DF or HJ strands?
Did more consecutive over-/under-passes get created when placing the strand on top of the 2 strands GC and BH?
Can this BH strand be re-routed in a P- move to reduce the number of crossings?
In the original diagram this P- move could have been done first as a P0 move and the P0 move mentioned above afterwards as P- move with the same total saving of 2 crossings.
In difficult problems it may be necessary to perform several P0 moves before a P- move becomes possible.
A diagram is maximally simplified if the number of crossings is the crossing number (see first section). In that case P0 moves will never enable a P- move.
To find a P0 move one looks for an over-strand or an under-strand just like for a P- move. To check whether a P0 move may be beneficial and enable a P- move one proceeds like in the case of the R3 move. One looks whether the removal of the strand increases the number of consecutive over- or under-passes of strands that were crossed and one checks whether after re-routing the new strand increases the number of consecutive over- or under-passes of strands that are crossed now. In either one of these cases one checks whether the strands with an increased number of consecutive over- or under-passes can be re-routed with less crossings.
Let us look at this example:
How many over-strands with at least 2 over-passes and how many under-strands with at least 2 under-passes do you see?
We get three over-strands with at least 2 over-passes: AB, GC, IE and three under-strands with at least 2 under-passes: EF, BH, DJ.
It is not difficult to see that the IE strand has a P0 move that re-locates it to cross over the GC and BH strand:
Did moving the IE strand increase the number of consecutive over-/under-passes of the previously crossed DF or HJ strands?
Yes, the HJ strand now has 2 over-passes but this strand can not be re-routed to link the same two holes with less over-passes.
Did more consecutive over-/under-passes get created when placing the strand on top of the 2 strands GC and BH?
Yes, the BH under-strand had 2 under-passes and now has 3 under-passes.
Can this BH strand be re-routed in a P- move to reduce the number of crossings?
Yes: The new route of the BH strand links the same holes but with only 1 under-pass instead of 3 under-passes.
The fact that the new strand is longer (involves more steps) in this diagram than the replaced strand does not matter. All that matters is the reduction of the number of crossings from 10 to 8 which now allows to identify this knot as knot 817.In the original diagram this P- move could have been done first as a P0 move and the P0 move mentioned above afterwards as P- move with the same total saving of 2 crossings.
In difficult problems it may be necessary to perform several P0 moves before a P- move becomes possible.
A diagram is maximally simplified if the number of crossings is the crossing number (see first section). In that case P0 moves will never enable a P- move.
Finding P+ Moves
A P+ move increases the number of crossings in a diagram. Why could such a move be useful for anything if the goal is usually to simplify diagrams? To see their purpose remind yourself about crossing numbers, handedness of crossings, writhe numbers and how the different Reidemeister moves affect both numbers. Then have a look at the following (difficult) challenge.
For a long time since the late 19th century two diagrams named 10161 and 10162 in the Dale Rolfsen Knot Table were thought to belong to two different knots. In 1973 Kenneth Perko realized that both represent the same knot. Since then the pair of entries in classical knot tables that actually represent the same knot is called Perko pair.
These two diagrams represent the same knot 10161. How can they be deformed into each other?
How can one find such a sequence of P+ and P- and possibly P0 moves that accomplish such a deformation?
Here is another challenge. How can these two diagrams be deformed into each other?
For a long time since the late 19th century two diagrams named 10161 and 10162 in the Dale Rolfsen Knot Table were thought to belong to two different knots. In 1973 Kenneth Perko realized that both represent the same knot. Since then the pair of entries in classical knot tables that actually represent the same knot is called Perko pair.
These two diagrams represent the same knot 10161. How can they be deformed into each other?
The following sequence of deformations changes a diagram of the knot 10161 with 0 left and 10 right handed crossings into a diagram with 1 left and 9 right handed crossings. Both diagrams have the same minimal number of 10 crossings but different writhe numbers 0−10 = −10 and 1−9 = −8. Only Reidemeister 1 moves can change the writhe number, but Reidemeister 1 moves also change the number of crossings. Because this knot has crossing number 10, the number of crossings cannot be decreased. Therefore to change the writhe number, the number of crossings has to be increased from 10 to 11 temporarily through a P+ move and decreased afterwards with a P- move to get again 10 crossings but with different writhe number.
The initial writhe #
is w = 0−10 = −10
is w = 0−10 = −10
P+ move (increasing # of ┼)
Now w = 1−10 = −9
R3 move (preserving w)
Afterwards
Inserting row + column
P- move (reducing # of ┼)
Now w = 1−9 = −8
Row removed
R3 move (preserving w)
Afterwards
In the final diagram the
writhe # is 1−9 = −8.
writhe # is 1−9 = −8.
How can one find such a sequence of P+ and P- and possibly P0 moves that accomplish such a deformation?
It is easy to determine the left- and right-handed crossings of both diagrams. If the writhe number is to be increased(decreased) to deform one diagram into the other one then one looks for a P+ move that adds a left-(right-)handed crossing and afterwards one needs a P- move that removes a right-(left-)handed crossing. In the above example the writhe number had to be increased and additional P0 moves (R3 moves are special types of P0 moves) were necessary.
If the writhe numbers differ by more then 2 then more than one pair of P+ and P- moves may be necessary.
If the writhe numbers differ by more then 2 then more than one pair of P+ and P- moves may be necessary.
Here is another challenge. How can these two diagrams be deformed into each other?
The following sequence of deformations changes the first diagram of the knot 11n116 with 6 left and 5 right handed crossings into the second diagram with 7 left and 4 right handed crossings. Both diagrams have the same minimal number of 11 crossings but different writhe numbers 6−5 = 1 and 7−4 = 3. Only Reidemeister 1 moves can change the writhe number, but Reidemeister 1 moves also change the number of crossings. Because this knot has crossing number 11, the current number of crossings cannot be decreased. Therefore to change the writhe number, the number of crossings has first to be increased from 11 to 12 through a P+ move before it can be decreased afterwards with a P- move to get again 11 crossings but with different writhe number.
Initial writhe # = 6−5 = 1
Widening
P+ move (increasing # of ┼)
After P+ move
Widening
P- move (reducing # of ┼)
After P- move
Shortening
Shortening
In the final diagram
the writhe # is 7−4 = 3.
the writhe # is 7−4 = 3.
Finding U1 Moves
A U1 move switches a crossing which afterwards allows to simplify the diagram to remove all crossings and show that the switch produced the unknot.
In general nice puzzles should have unique solutions so our U1 and U2 puzzles show diagrams where the switch of only one crossing results in the unknot. This hint allows you to cut down the search
If the diagram includes a twist of the knot line like this:
would it matter which one of the crossings is switched?
If there are still several crossing candidates, one should try to imagine how many R1, R2 moves will become available through the switch and try that switch first which seems to allow the most simplifications afterwards.
Another hint to minimize trying switches is to imagine whether after the switch there will definitely be a knot remaining, like a trefoil. If so then that switch is not the correct one in U1 puzzles.
On the worksheet the number of available switches is limited to the minimum that is needed to get the unknot. If you did a switch one can not switch it back because the diagram may have been changed, so one would have to reset the diagram.
In general nice puzzles should have unique solutions so our U1 and U2 puzzles show diagrams where the switch of only one crossing results in the unknot. This hint allows you to cut down the search
If the diagram includes a twist of the knot line like this:
It will not matter which crossing is switched. Both results are equivalent:
Therefore either both of these crossings are unknotting switches or none of them. Because our puzzles have only one unknotting switch, these two crossings can be ignored.
=
=
If there are still several crossing candidates, one should try to imagine how many R1, R2 moves will become available through the switch and try that switch first which seems to allow the most simplifications afterwards.
Another hint to minimize trying switches is to imagine whether after the switch there will definitely be a knot remaining, like a trefoil. If so then that switch is not the correct one in U1 puzzles.
On the worksheet the number of available switches is limited to the minimum that is needed to get the unknot. If you did a switch one can not switch it back because the diagram may have been changed, so one would have to reset the diagram.
Finding U2 Moves
For U2 puzzles the same hint about equivalent switches applies as for U1 puzzles. Also for U2 puzzles there is just one crossing that reduces the unknotting number, i.e. makes progress towards the unknot. Once that unique first crossing is switched and the resulting diagram is simplified, there may be more than one switch possible that creates the unknot.
Finding P0U Moves
Research performed by Caribou Contests on unknotting numbers showed that there exists maximally simplified knot diagrams (with the minimal number of crossings), which do not have a simplifying switch. In other words, there are diagrams where switching any crossings will not make progress to reach the unknot. In that case one first has to perform one or more P0 moves that change the puzzle into a U2 puzzle. The good news is that diagrams requiring P0 moves first are rare and therefore it will be likely that any P0 moves will change it into a U2 puzzle.
Tips and Tricks by Puzzle Type
The Unknotting challenges on this site are specially selected. Knowing how they are special can help to solve them.
R3 Moves
U1 and U2 Moves
P0 Moves
P0U Moves
R3 Moves
As discussed earlier, to see whether a R3 move is beneficial one needs to check the continuation of the middle arc in the R3 hole. The puzzles in the R3 category allow a very special R3 move that is doubly beneficial:
1) When extending the middle arc of the R3 hole beyond the underpass then the next pass is an overpass.
2) When extending the middle arc of the R3 hole beyond the overpass then the next pass is an underpass.
Therefore the R3 move increases for the middle strand the number of successive overpasses on one side and the number of successive passes on the other side. Such doubly beneficial R3 holes are easy to spot.
U1 and U2 Moves
Puzzles in the U1 and U2 category are special in that only one crossing has the property that switching it makes progress in unknotting. If two strands spiral like this:
then switching either one of the two crossings has the same effect of untangling the two strands. If switching one crossing would work then switching the other one would work too, so neither of these can be the correct single crossing to switch.
P0 Moves
Because the R3 category has only puzzles which have a doubly beneficial R3 move, the P0 category contains, among others, puzzles where the best first move is a single beneficial R3 move. So one should not exclude looking at R3 moves as the first move in this category.
P0U Moves
In our research of unknotting moves we found that it is very rare that a knot projection is on one hand fully simplified, i.e. it has the minimal number of crossings possible for this knot, and on the other hand, none of its crossings, when switched, will reduce the number of further switches that are needed to reach the unknot. How does that knowledge help? From this hint we can draw the conclusion that after an initial P0 move (which includes single beneficial R3 moves), the only switches one needs to try are those of new crossings that appear due to the initial P0 move.
More References about Knots
Mathematical Knot Theory is an old research subject so there exists a vast amount of literature for it. However, it also is a young subject as several milestones have only been reached in recent decades. For example, there is a scientific "Journal of Knot Theory and Its Ramifications" dedicated to knots which has a new issue every month.
A great book that we recommend is: Adams, Colin (2004), The Knot Book: An Elementary Introduction to the Mathematical Theory of Knots, American Mathematical Society, ISBN 978-0-8218-3678-1
There are also many websites about knots. A good place to start is the Knot Theory page on Wikipedia.
For videos, check out Numberphile's Playlist of Knot videos on YouTube. They also have a great explanation of Colouring Knots, which is another way to help identify diagrams of the same knot.
Caribou produced two posters on Unknotting and colouring knots.


Follow or subscribe for updates: